MapPlace 2 Tools
Pan
The Pan tool can be accessed from the Toolbar and from the Map Window menu (right click anywhere in the map window to see the menu). It must be active for panning in the Map Window to work.
To pan, click anywhere within the Map Window and drag the cursor while holding the left mouse button down. The map will move in the same direction as the cursor. Release the left mouse button to end the panning operation.
Alternatively, the arrows at the bottom of the Navigation Control can be used to pan the Map Window.

Zoom
The different ways to zoom in and out are outlined below. Zoom levels are hard coded by the system and cannot be changed by the user. The scales of each zoom step are approximate and are determined by screen resolution.
![]()
Navigation Control
The Navigation Control is at the top right corner of the Map Window. It offers two ways of zooming in and out. Clicking the + will zoom in one step, and clicking the - will zoom out one step. Dragging the slider up will zoom in, and dragging it down will zoom out.
Mouse wheel/touch pad scroll gesture
Using the mouse or touch pad to scroll up while the cursor is in the Map Window will zoom in, and scroll down will zoom out.
Zoom Rectangle
![]()
The Zoom Rectangle button is on the Toolbar and in the Map Window menu. This tool zooms to a rectangular area drawn with the mouse. Activate the tool, left click, hold and drag to draw a rectangle over the area of interest. When the left button is released, it zooms to the full extent of the rectangle.
Zoom In and Zoom Out buttons
![]()
These buttons are on the Toolbar and in the Map Window menu. They are equivalent to the + and - buttons in the Navigation Control. One click of the Zoom In or Zoom Out zooms the Map Window in or out by one zoom level.
Zoom Extents
![]()
This tool is on the Toolbar and in the Map Window menu. It adjusts the Map Window zoom level to fit the entire province.
Zoom Selection
This tool is on the Toolbar and in the Map Window menu. It is only available if features are selected. It adjusts the zoom level to fit all the features selected in the Map Window.
Previous and Next
![]()
These tools are on the Toolbar and in the Map Window menu. They control pan and zoom of the Map Window. The Previous tool returns to the previous location and zoom level of the Map Window; it can go back several steps. The Next tool is only available if the Previous tool has been used. It reverses the changes in zoom and location done using the Previous tool.
Map Window Scale Box
The zoom level can be changed by entering a scale in the Scale box on the Information Bar and pressing the Enter key. Because scales are predetermined bythe system, the scale displayed will adjust to the level nearest to the value entered.
Select
MapPlace 2 offers several tools to select features from active layers. A layer must be visible in the Map Window for its features to be selectable. The selection tools select features from all visible layers. To limit selection to specific layers, ensure they are the only ones turned on in the Legend Pane. Features selected are highlighted in blue in the Map Window. Selection information on number of selected features and layers is displayed in the Information Bar. Attributes of selected items can be viewed in the Selection Pane.
Select
The basic Select tool is on the Toolbar and in the Map Window menu. It must be activated to enable selection. Once the tool is active it can be used in two ways.
1) Select single features by clicking on or in the feature.
2) To select multiple features, left click, hold and drag to draw a rectangle over the features. When the button is released all features in the selection area are selected. Alternatively, multiple features can be selected by holding the Shift key and clicking on each feature.
Select Radius
![]()
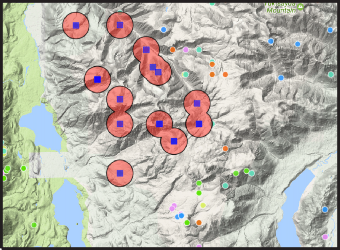
Select Radius, on the Toolbar and in the Map Window menu, is used to select all features in a circular area. To use the tool, activate it then click on the centre point of the area to select and, while holding the left mouse button down, drag the cursor away from the centre. Once the circle is at the desired size, release the left mouse button. All features in the circle are selected.
Select Polygon
Select Polygon, on the Toolbar and in the Map Window menu, is used to select features in a polygonal area. To use it, activate it then left click on one of the vertices of the polygon, and then click at all vertices, creating the outline of the polygon. Once the polygon is complete, double click the last vertex, which will complete the selection.
Select Within
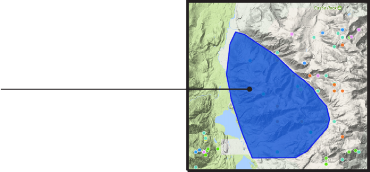
Spatial queries search features based on location or spatial relationships with other features (eg. finding mineral occurrences in the Late Triassic volcanic rocks in the Takla Group). In MapPlace 2, Select Within is the tool to use for spatial queries. It selects features from one layer in a selected polygon from another layer as follows.
a) Select a polygon or set of polygons within which you want to select data. This can be a single feature in a polygon layer, multiple features in one or multiple layers, a Redline feature or a Buffer layer feature.
b) From the Legend Pane, turn on the layer(s) to select features from.
c) From the Map Window menu, under Select More, click Select Within.

d) In the Tasks Pane, under Restrict results to selected layers: select the layers with the desired features (to select multiple layers hold the ctrl key down while clicking; the layers must be turned on in the Legends Pane otherwise their features will not be selected.)
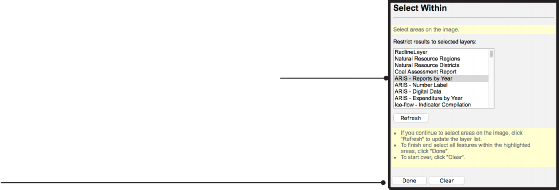
e) Click Done.
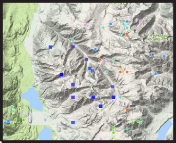
The selected features are highlighted in blue in the Map Window.
Clear Selection
![]()
The Clear Selection tool is on the Toolbar and in the Map Window menu. Only available when features are selected, it deselects all features.
Measure
The Measure tool is in the Toolbar and in the Task List in the Tasks Pane.
When it is activated, measurements and instructions are shown in the Tasks Pane.

A yellow overlay in the top portion of the Map Window also indicates that the tool is active.
![]()
To measure a distance and/or area left click at the starting point in the Map Window, then click at the end point to create a line (or multiple points to create a polygon). Double click when you are done. All measurements are displayed in the Tasks Pane. If a single point is clicked, the distance between that point and the cursor is displayed. If multiple points are clicked, the length of each segment is shown, along with the perimeter and polygon area. The Esc key clears the line or polygon.
By default the units are metres, but can be changed to miles by selecting the Imperial option from the Options menu in the Toolbar. This also changes location coordinate units displayed in the Information Bar. If, in the process of measuring, the cursor goes over the Navigation Control, the measurement line or polygon is reset.
Refresh
![]()
The Refresh tool reloads all of the components of the Map Window. It is on the Toolbar and in the Map Window menu. To use the Refresh tool, click the button and the Map Window will immediately refresh.
Maptips
![]()
Maptips are displayed in the Map Window when the cursor hovers over a feature. They are used to quickly display a few attributes of that feature. The exact attributes vary by layer. Hyperlinks to pages with further details are commonly given.
Maptips are activated by default but can be turned on or off by clicking the Maptip button in the Toolbar.
![]()
Buffer
![]()
The Select Within tool only accepts polygons as a spatial filter. This works well when a query is based on an existing polygon layer (e.g., Find all MINFILE occurrences in a rock unit or a claim block) but what if you would like to select features near a line (e.g. assessment reports near a fault) or point (e.g. assessment reports near a cluster of MINFILE occurrences)? The Buffer tool can be used to create polygons to use as a spatial filter from any selection on any type of layer as follows.
a) Select the feature or features around which to create a buffer. These can be points, lines, polygons or any combination.
b) Click the Buffer tool in the Toolbar.
Complete the following steps in the Tasks Pane
c) Set the distance around features for the buffer.
d) Select the layers to include in the buffer. Only layers with selected features are listed. If creating a buffer around a multi-layer selection hold the Ctrl key down while clicking the layer name.
e) Set the name of the buffer layer. This layer will appear in the Legend Pane with this name, which cannot be changed once the buffer is created.
f) Settings for the buffer fill and border styles can be adjusted. These cannot be changed once the buffer layer is created.
g) Click Done

The buffer is created, added to the Legend Pane as a layer (at the top of the list), and displayed in the Map Window. It can now be selected and used as any other polygon layer to do a spatial query using the Select Within tool.
![]()
Redline
![]()
The Redline tool can be used to annotate and draw on maps. It can create points (e.g., sample locations), lines (e.g., faults, traverse routes) and polygons (e.g., areas of interest, rock units). All features can be assigned custom labels. Redline layer styles can be used to change symbol type, colour, size, and transparency. A Redline layer is created as follows.
a) Start the Redline tool from the Task List in the Tasks Pane.

b) In the Create New Redline section, check/uncheck boxes so that only the feature type to be created is left checked (e.g., to create point features leave Point checked and uncheck Line and Polygon).
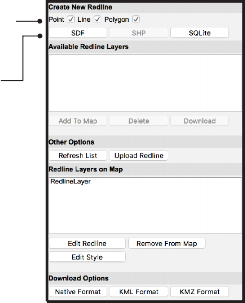
c) Click SHP. This sets the file format being created; once features are created it cannot be changed. SDF, SHP, and SQLite are different file formats. We recommend using the SHP format (ESRI shapefile).
d) The Edit Redline pane will open when you choose the file format. In the Digitize Redline section, select the type of feature to create (different options are available, depending on the type selected in the previous screen).
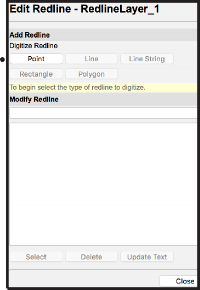
e) Draw the feature in the Map Window. For points, click the location. For lines and polygons, click each vertex, double clicking the final vertex to complete the drawing.
f) If desired, add labels by entering text in the box below Modify Redline, then click Update Text.
The RedlineLayer is added to the Markup folder in the Legend Pane. Redline layer styles can be edited as follows.
a) In the Redline Layers on Map section (Tasks Pane, in the Manage Redline tool) select the RedlineLayer to edit.
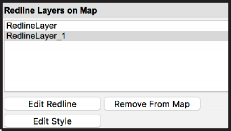
b) Click the Edit Style button.
c) Find the feature type in the Redline layer and edit.

d) Click OK
The Redline layer is updated in the Map Window to reflect the changes.
In the Download Options section, the Native Format button downloads a zip file containing the shapefile of the features created.
![]()
Quick Plot
![]()
With the Quick Plot tool, users can create personalized maps that include user-defined cartographic elements. These maps can be saved in PDF format. The tool is accessed from the Toolbar.
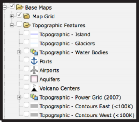
Because of licensing restrictions, External Provider base maps or imagery cannot be displayed in maps created by Quick Plots. To ensure base map data are displayed on the map, turn on the Base Maps folder and other topographic features as desired.
Create a map using the Quick Plot tool, by clicking Quick Plot on the Toolbar and completing the steps below in the Tasks Pane.
a) Enter a Title for the map in the text box under Title.
b) Enter a sub-title for the map under Sub Title.
c) Chose a Paper size.
d) Chose Portrait or Landscape orientation.
e) Select the cartographic elements to include by checking boxes in the Show Elements section.
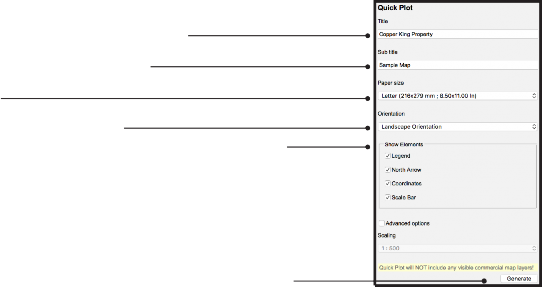
f) Unless the map scale needs to be set (following page), click Generate.
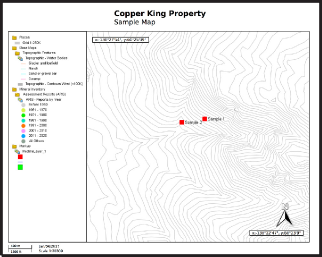
The map is opened in a new browser tab where it can be printed or saved as a PDF file. If changes need to be made, close the tab that contains the map and return to the MapPlace 2 interface. The Quick Plot tool will stay open in the Tasks Pane; change the desired settings and regenerate the map.
Create a map at a set scale as follows.
a) Create the map as described previously, but instead of clicking Generate, check the box next to Advance Options.
b) Select the desired scale from the list under Scaling.

c) A blue box will appear in the centre of the Map Window showing the extent of the map. The location of the map can be adjusted by clicking in and dragging the box. The orientation of the map can be changed by clicking the dot above the box and dragging the cursor.

d) Once the scale, location, and orientation of the map are set, click Generate.
The map again will open in a new browser tab.
Database search tools
Search tools are available for most databases accessed by MapPlace 2. These tools are in the Task List in the Tasks Pane.
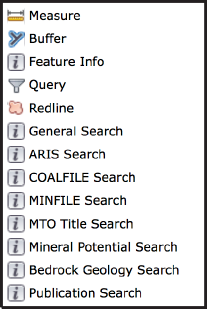
General Search
Locations in the province can be searched for using place names, latitude and longitude, and NTS or TRIM map sheet numbers.
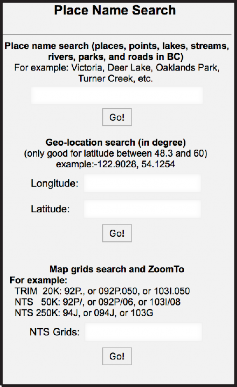
Place Name Search
Search for points of interest such as cities, roads, lakes, streams, and parks by name (e.g., ‘Merritt’, ‘Mount Robson’, ‘Fraser River’).
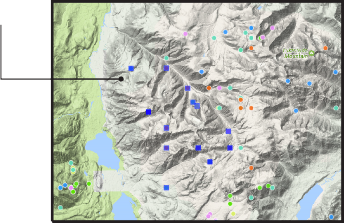
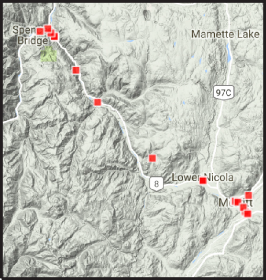
The Place Name Search tool returns a list of locations with names that contain the searched string in the Tasks Pane. Clicking on place names returned in the Tasks Pane centres and zooms the map window to the location.

A point layer in the Legend Pane is created called Place Query Result that highlights search results with red squares in the Map Window.
Search by coordinates
Search for a location by its latitude and longitude in decimal degrees; longitudes need to be entered as negative values (e.g., -122.9028).
The Search by coordinates tool returns a link in the Tasks Pane. The ZoomTo link centres and zooms the map window to the searched latitude and longitude. Clicking the Go Back link will return to the Geo-location search menu. This search does not create a layer in the Legends Pane or display any data in the Map Window.

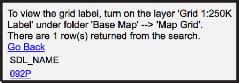
Search by map grid
Search for map sheets by their NTS or TRIM map sheet numbers (e,g., 092/P06).
The Search by map grid results in a link to the searched map sheet. Clicking the link centres and zooms the Map Window to the centre of the map sheet. Clicking the Go Back link will return to the Geo-location search menu. This search does not create a layer in the Legends Pane or display any data in the Map Window.
ARIS Search
The ARIS Search tool provides several ways of searching for Assessment Reports. They are outlined below.
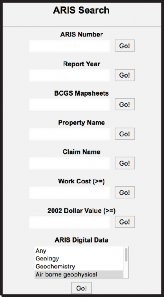
ARIS Number
Search for reports by their ARIS numbers. These numbers are assigned by the Ministry as reports are received. Only exact matches are returned so the entire ARIS number must be entered (e.g., 32523).
Report Year
Search for reports by the year they were received (e.g., 1996).
BCGS Mapsheets
Search for reports by the BC Geographic System map sheet numbers they cover (e.g., 104A051).
Property Name
Search for reports by the name of the property where the work was completed (e.g., Peach). This search is case sensitive (i.e., ‘Peach’ and ‘peach’ will not return the same results).
Claim Name
Search reports by the name(s) of the claim(s) it covers (e.g., BIG BEAR). This search is case sensitive (i.e., BIG BEAR and big bear will not return the same results).
Work Cost (>=)
The work cost search returns reports where the cost was equal to or greater than a value entered. This search only accepts numbers, no commas or spaces (e.g., 3000000 is acceptable, but 3,000,000 or 3 000 000 will not work).
2002 Dollar Value (>=)
The 2002 dollar value search returns reports where the cost was equal to or greater than a value entered. This search only accepts numbers, no commas or spaces (e.g., 3000000 is acceptable, but 3,000,000 or 3 000 000 will not work).
ARIS Digital Data
Assessment reports where digital data are available to download can be searched by type of data. For example, selecting ‘Drilling’ will return all reports that contain digital drill data).
ARIS Search results
All ARIS searches results are listed in the Tasks Pane along with the report year, property name, claim names, report title, work cost, and 2002 dollar value. Click the ARIS Number highlighted in blue to center and zoom the map window to the report’s location. Clicking the Download Excel button at the top of the ARIS search results downloads a spreadsheet of the results with attributes for each feature, including latitudes and longitudes.
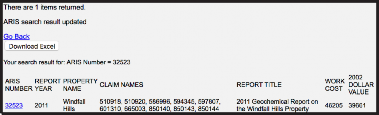
All ARIS Search tools also create a layer in the Legends Pane called ARIS Search Result, which displays the reports’ location as red squares in the Map Window.
MINFILE Search
The MINFILE Search tool is in the Tasks Pane and enables searches by individual attributes, a combination of attributes, and region.

MINFILE Selection
This section offers tools to search for MINFILE occurrences based on individual attributes.
Commodity
Search for occurrences by commodity by selecting one from the list (e.g., Copper).
MINFILE Name
Search for occurrences by entering any part of a name (e.g., Kemess). This search is not case sensitive (i.e., KEMESS and kemess will return the same results).
MINFILE Number
MINFILE number searches need enter only part of a nine-character number (e.g., 094E returns all occurrences in map sheet 094E, whereas 094E 094 returns a single showing). A quadrant identifier (NE, NW, SE, SW) is added in areas with a high density of occurrences; in others two spaces are required after the map sheet component. The exception is 092IW, where only 1 space is required.
MINFILE Status
Search for occurrences by their status. Only one status can be selected at a time (e.g., Developed Prospect).
Production: Tonnes Mined
Search for occurrences by total tonnes mined. Select one of the ‘operators’ (e.g., equal or less) and enter a number in the search box. This field only accepts numbers, do not use commas or spaces as a separator (e.g., 1,000,000 should be entered as 1000000).
Production: Tonnes Milled
Search for occurrences by total tonnes milled. Select one of the ‘operators’ (e.g., equal or less) and enter a number in the search box. This field only accepts numbers, do not use commas or spaces as a separator (e.g., 1,000,000 should be entered as 1000000).
Mineral Deposit Profile Type
Search for occurrences by deposit type. Only one type can be selected at a time (e.g., PORPHYRY).
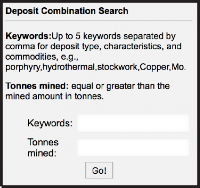
Deposit Combination Search
Using the Deposit Combination Search more than one attribute can be searched for at a time. Enter separate keywords (maximum of five) separated by a comma (do not add spaces between words). The Tonnes mined box will find all occurrences with values equal to or greater than the value entered (no commas or spaces in the number); if left blank all values will be allowed. Results will contain all values entered in these fields (e.g., occurrences that have porphyry AND copper AND 1000000 or more tonnes mined in their attributes will be listed).
MINFILE by regions
With MINFILE by Regions, MINFILE occurrences can be searched for by regions or mapsheets.
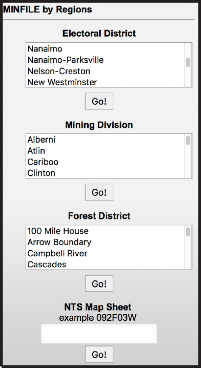
Electoral District
Search for MINFILE occurrences within an electoral district (e.g., Columbia River-Revelstoke). Only one district can be selected at a time.
Mining Division
Search for MINFILE occurrences within a Mining Division (e.g., Atlin). Only one mining division can be selected at a time.
Forest District
Search for MINFILE occurrences within a Forest District (e.g., Cascades). Only one forest district can be selected at a time.
NTS Map Sheet
Search for MINFILE occurrences within an NTS map sheet (e.g., 092 or 092F03). This tool can search using 1:1,000,000, 1:250,000 or 1:50,000 map sheet alphanumerical ID’s.
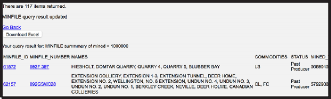
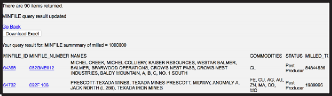
MINFILE Search results
The MINFILE Search results page includes a Download Excel button that populates an Excel spreadsheet with the search results.

The results are sorted by MINFILE_ID and displayed along with MINFILE_NUMBER, NAMES, COMMODITIES and STATUS. Clicking the MINFILE_ID entry will zoom and centre the Map Window on that occurrence. Click the MINFILE_NUMBER to open the MINFILE Record Summary webpage in a new tab containing the complete MINFILE.
All MINFILE Searches create a layer in the Legend Pane called MINFILE Query Result. It displays red squares in the map window for all MINFILE occurrences found as a result of the search.
Production: Tonnes Mined
In addition to the above attributes, the results page for the tonnes mined search displays a MINED_TONNES field.
Production: Tonnes Milled
In addition to the above attributes, the results page for the tonnes milled search displays the MILLED_TONNES field.
MTO Title Search
Search the Mineral Titles Online’s database for mineral, placer or coal tenures by selected attributes.
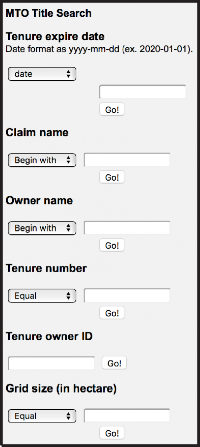
Tenure due date
Search for tenure by their due date (e.g., entering 180 for Within (days) will find all tenures with a due date in the next 180 days). Options for tenure expire date include a specific date, on today’s date, within a certain number of days of today’s date, in a certain year or between two dates.
Claim name
When searching for tenure by the claim name, selecting ‘Begin with’ will search for a name that begins with the search string. It can be followed by anything.
For example, searching for ‘big’ returns all claims with names beginning with big (e.g., BIG BULK). Using ‘Contains’ will find any tenure with a name that contains the search string anywhere in its name. For example, searching for ‘big’ returns claims with ‘big’ anywhere (e.g., KAMLOOPS BIG ONE). Using ‘Equal to’ will only return exact matches. Claim name searches are not case sensitive.
Owner name
Owner name searches operate in the same way as claim name searches (see above).
Tenure number
For tenure title number searches (e.g., 250684), ‘Equal’ will find the tenure that exactly matches the search term. ‘Between’ will find all tenure in a range between two tenure numbers.
Tenure owner ID
You can search for all tenure by an owner using an ID number. For example, ‘266048’ will return all claims owned by Dolly Varden Silver Corp. The ID must be an exact match; partial numbers will not return a result.
Grid size (in hectare)
A grid size query will display all tenure with a specified surface area. For example, entering 100 for Equal or larger will display all tenure with a surface area of 100 hectares or more.
MTO Title Search results
All MTO Title searches create a layer in the Legend Pane called MTO Query Result. This layer displays the search results as red polygons in the Map Window.
![]()
All results in the Task pane include a Download Excel button that populates an Excel spreadsheet with the search results and selected attributes that can be saved.
Tenure due date query, Claim name query and Tenure number query results
Results are listed with a ZoomTo link that zooms and the map window to the associated tenure. The attributes listed for each tenure are TENURE_NUM, CLAIM_NAME and EXPIRE_DATE. Clicking on the tenure number opens a new browser tab with all of the title’s details from the MTO database.

Owner name search results
The results are similar to those above. The ZoomTo link zooms and centres the map window to the associated tenure, clicking on the tenure number opens the MTO Title details page in another browser tab. The attributes listed for each tenure are TENURE_NUM, OWNER_NAME and EXPIRE_DATE.

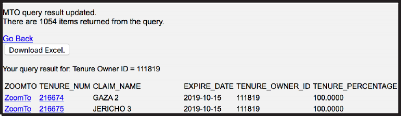
Tenure owner ID query results
As with the other MTO search results, the ZoomTo link zooms and centres the map window to the associated tenure and clicking on the tenure number opens a new tab with the title details from the MTO database.
The attributes listed for search results are: TENURE_NUM, CLAIM_NAME, EXPIRE_DATE, TENURE_OWNER_ID, TENURE_PERCENTAGE.OWNER_NAME and EXPIRE_DATE.
Grid size query (in hectares) results
The ZoomTo link centres and zooms the map window to the associated tenure and clicking the tenure number opens the MTO title details page in a new tab. The attributes listed for each result are: TENURE_NUM, CLAIM_NAME and EXPIRE_DATE.

Mineral Potential Search
Search the Mineral Resource Assessment database for tracts that have a discovery potential confidence level of 50% or more for deposit types selected from a list.

Results of this search are added as a layer in the Legend Pane and listed in the Tasks Pane. The results page for this tool is currently under development.
Bedrock Geology Search
Search the BCGS Bedrock Geology database on selected attributes
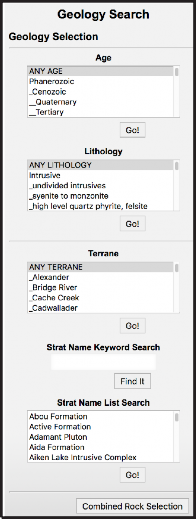
Age
Search for bedrock geology units by eon, era or period by selecting from a list (e.g., Cretaceous). Only one item can be selected at a time.
Lithology
Search for bedrock geology units by lithology by selecting from a list (e.g., Orthogneiss). Only one item can be selected at a time.
Terrane
Search for bedrock geology units by terrane name by selecting from a list (e.g., Cache Creek). Only one item can be selected at a time.
Strat Name Keyword Search
Search for bedrock geology units by stratigraphic unit name using keywords (e.g., Cache Creek).
Strat Name List Search
Search for bedrock geology units by stratigraphic unit name by selecting from a list (e.g., Adamant Pluton). Only one item can be selected at a time.
Combined Rock Selection
Combine elements from the above searches to restrict your searches further. Select elements in any of the searches on this page, but instead of clicking the individual Go! buttons, click the Combined Rock Selection button.
Bedrock Geology Search results
All bedrock geology searches display results in a new layer in the Legend Pane called Geology Query Result. The results page within the Tasks Pane lists the units’ STRAT_UNIT codes, STRAT_AGE, ROCK_TYPE, ROCK_CLASS and TERRANE. Clicking on the STRAT_UNIT code zooms and centres the map window to the associated unit’s polygon.
![]()

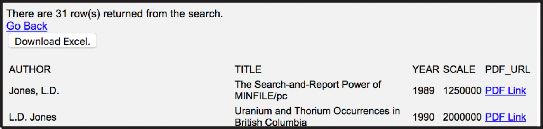
Publications Search
Search the BCGS Publications Catalogue using selected fields.
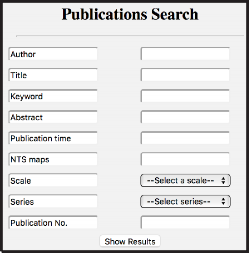
Results are returned as a list in the Tasks Pane that includes Authors, Publication Title, Year, Scale and a link to the web page with additional information and download links. A Download Excel button will generate a spreadsheet of the results with selected attributes. A spatial component for this search is planned for future development.