Changing the Map View
You can do any of the following operations to change the view of a map:
Zooming to a Specific Location or Address
Zooming to a map width
Zooming to a map scale
Zooming in by a magnification factor of two
Zooming to a rectangular area
Zooming to selected map features
Zooming to the previous view
Zooming out by a magnification factor of two
Zooming out to display the entire map
Moving up, down, left, or right (panning)
Saving the current view in a bookmark
Viewing a bookmark
Deleting a bookmark
You can use the Zoom Goto
dialog box to zoom to a location, such as an airport, or to a US street address or ZIP
code.
To display the Zoom Goto dialog box, click the Zoom Goto button on the toolbar,
or right-click in the map and choose Zoom > Goto from the popup menu.
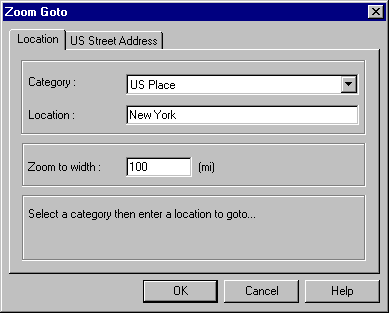
You can
now do one of the following tasks.
To zoom to a location:
- Click the Location tab, and then select a category from the Category list.
- Type a location name to use as the center of the map, type the map width to display, and then click OK.
You can enter just a portion of the name you are looking for. Autodesk MapGuide will return a list of places that contain the text you entered. For example, to find San
Francisco, you could type "San" to receive a list of all places that begin with
"San," and then choose San Francisco from the list.
Note You specify the width in the current display units. If the location you're zooming to is a point or text feature, type the width of the area you want to display in the map window. If the location is not a point or text feature and you specify a width, the width setting will be ignored.
- If the zoom location has an access key assigned to it, enter
the access key. You will need to contact the author of
the map if you do not know the access key.
To zoom to a street address or ZIP code:
- Click the US Street Address tab (not available on all maps), and then enter a complete US street address (address, city, and state) or a ZIP code.
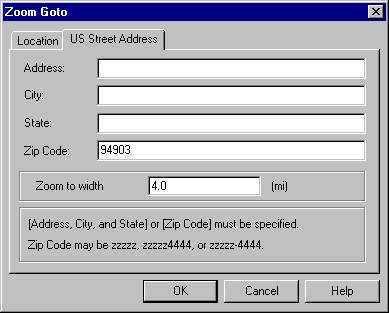
- Type the map width to display, and then click OK.
Note You specify the width in the current display units.
You can zoom to a specific width in a map.
Note You specify the width in the current display
units.
To zoom to a map width
- Right-click in the map, and then choose Zoom > Width from the popup menu to display the Zoom Width dialog box.
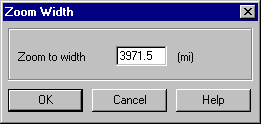
- Enter a value in the Zoom Width dialog box, and then click OK.
The map zooms in or out to the width you specified, retaining the current center of the map.
You can specify the map
scale to zoom to. Remember that the larger the second number in the scale ratio is, the
more you will zoom out, so you will display a larger area with less detail. The smaller
the second number is, the more you will zoom in, so you will display a smaller area with
more detail.
To zoom to a map scale
- Right-click in the map, and then choose Zoom > Scale from the popup menu to display the Zoom Scale dialog box.
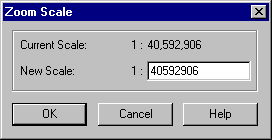
- In the text box, type the
scale ratio you want to use. For example, to zoom to a scale of 1:200000, type 200000 in
the text box.
- Click OK.
The map zooms in or out to
the scale you specified, retaining the current center of the map.
You can click a point in the map to zoom in on that point.
To zoom in by a magnification factor of two
- Click the Zoom button on the toolbar, or right-click in the map and choose
Zoom > Zoom from the popup menu.
- Click a point to be the center of the redrawn map.
The map zooms in on the point you clicked to display the map at twice the previous magnification.
You can continue to zoom in by clicking another point in the map.
- When you finish zooming, press ESC, click the Select button on the toolbar, or choose Select > Select from the Map Window popup menu. Note that pressing
ESC does not work if you are using the Java Edition of the Viewer on an
Apple Macintosh computer.
You can use the mouse pointer to draw a rectangular area on the map and then zoom in to that area.
To zoom to a rectangular area
- Click the Zoom button on the toolbar, or right-click in the map and choose Zoom > Zoom from the popup menu.
- Press the mouse button and drag to draw a rectangle over the area you want to display.
When you release the mouse button, the rectangle disappears, and the map zooms in to display the area within the rectangle at the highest possible magnification.
You can continue by zooming in on other rectangular areas.
- When you finish
zooming, press ESC, click the Select button on the toolbar, or choose Select > Select from the popup menu. Note that pressing ESC does not work if you are
using the Java Edition of the Viewer on an Apple Macintosh computer.
After you select features in a map,
you can zoom in to display just enough of the map to show those features.
To zoom to selected map features
- Select one or more features.
- Right-click in the map, and then choose Zoom > Selected from the popup menu.
The map centers on the selected features and zooms in far enough to display only the selected features.
You can redraw the map at the previous zoom magnification and location.
To zoom to the previous view
- Right-click
in the map, and then choose Zoom > Previous from the popup menu,
or click the Zoom Previous button on the toolbar.
You can click a point on the map to recenter the map on that point and zoom out.
To zoom out by a magnification factor of two
- Click the Zoom Out button on the toolbar, or right-click in the map and
choose Zoom > Out from the popup menu.
- Click a point on which to center and redraw the map.
The map zooms out on the point you clicked and displays the map at half the previous magnification.
You can continue to zoom out by clicking another point in the map.
- When you
finish zooming out, press ESC, click the Select button on the toolbar, or choose
Select > Select from the Map Window popup menu. Note that pressing ESC does
not work if you are using the Java Edition of the Viewer on an Apple Macintosh
computer.
You can zoom out to display the entire map.
To zoom out to display the entire map
- Click the Unzoom button on the toolbar, or right-click
in the map and choose Zoom > Unzoom from the popup menu.
You can move the map around to display areas that are outside of the current view.
To move up, down, left, or right (pan)
- Click the Pan button on the toolbar, or right-click in the map and choose Pan from the popup menu. Notice that the cursor changes to a "hand."
- Press the mouse button and drag to move the map around.
- Release the mouse button to redraw the map and show the new view.
You can continue panning by dragging the map again.
- When you finish panning,
press ESC, click the Select button on the toolbar, or choose Select >
Select from the Map Window popup menu. Note that pressing ESC does not work
if you are using the Java Edition of the Viewer on an Apple Macintosh computer.
After you zoom and pan to position the map exactly as you want it, you can save the
current view of the map as a bookmark. A bookmark saves all of the information about the
current view of the map under a name you specify. By using the bookmark in the future, you
can go directly to this same view of the map without having to zoom and pan again. To save the current view as a bookmark, do the following:
To save the current view in a bookmark
- Right-click in the map, and then choose Bookmarks > Add Bookmark from
the popup menu to display the Add Bookmark dialog box.
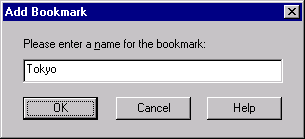
- Enter a name for this bookmark, and then click OK.
Note Be sure to use a unique name for the bookmark. If
you use an existing name, both bookmarks will appear in the menu under the
same name with no way to tell them apart. The name you type or select for
your bookmark cannot contain any commas (,), question marks (?), ampersands
(&), or pound symbols (#).
You can go directly to a map or portion of a map that you saved previously
as a bookmark.
To view a bookmark
- choose Bookmarks from the popup menu.
- Click the name of the bookmark you want to view.
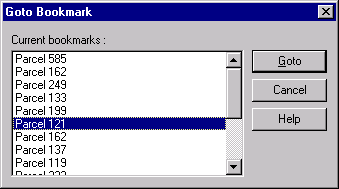
If you have added
more bookmarks than can be displayed in the popup menu, choose Bookmarks > More Bookmarks from the popup menu, and then select the bookmark you want
from the Goto Bookmark dialog box.
You can delete one or more bookmarks if you no longer need them.
- Choose Bookmarks > Delete Bookmarks from
the popup menu, select the bookmark(s) you want to delete, and then click OK.


