MapBuilder Help
Click on a tool to see help for that item.
Open
Save
Print
Collapse
Expand
Edit
Help
MapBuilder
Symbol
Polyline
Polygon
Text
Delete
Preferences
Layers
Highlight Tenure
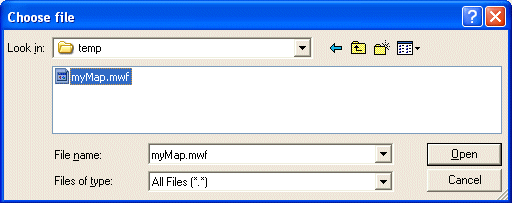
Open
Open a map you have saved to your computer.
Click Open
Select a map you have saved on your computer. The file type must be '.mwf'
Click Open
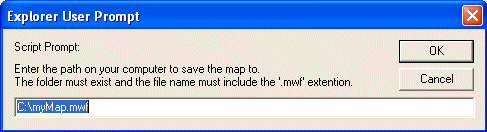
Save
Save a map you have created to your computer so you can open and edit it at a later date.
Click Save
Enter the path on your computer where you want to save the map to. Ex: 'C:\myMap.mwf'
Note: the path you enter must exist and the file name must include the '.mwf' extention
Click OK
If you have specified a proper path and file name the map will save
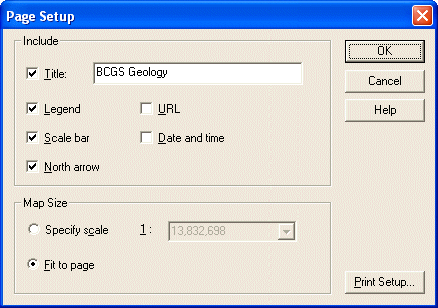
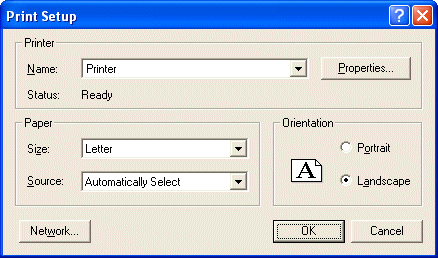
Print
Prints the map.
Click Print
Remember you can add a title to your map by right clicking the map and selecting Page Setup
You can print in landscape mode by clicking Properties in the print menu or Print Setup in the Page Setup menu
Collapse
Collapses all the layer groups in the legend.
Expand
Expands all the layer groups in the legend.
Edit
Displays tools that let you make edits to your map. You can add symbols, lines, polygons, and text, and manipulate layers.
Help
Displays this help menu.
Symbol
Adds a symbol to the map.
Click Symbol
Click the point on the map where you would like to add the symbol
Modify the symbol type, size and rotation in Preferences
Polyline
Adds a line to the map.
Click Polyline
Click the point on the map where you would like the line to start
Move the cursor and click again to add a segment to the line
Add as many segments as you like
Double click to end the line
Modify the line color, style and thickness in Preferences
Polygon
Adds a polygon to the map
Click Polygon
Click the point on the map where you would like the polygon to start
Move the cursor and click again to add a vertex to the polygon
Add as many verticies as you like
Double click to close the polygon
Modify polygon colour and style in Preferences
Text
Adds text to the map.
Click Text
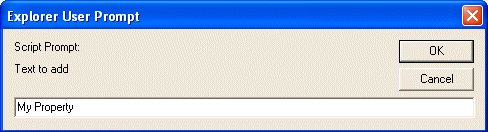
Type the text you wish to add to the map in the form
Note: you can add a carridge return to you text by typing '\n' in the form. Ex: 'My\nProperty'
Click the point on the map where you would like to add the text
Modify text font colour, size, rotation and style of your text in Preferences
Delete
Deletes selected map features from the markup layer.
Select one or more features from the Markup layer
Click Delete
Preferences
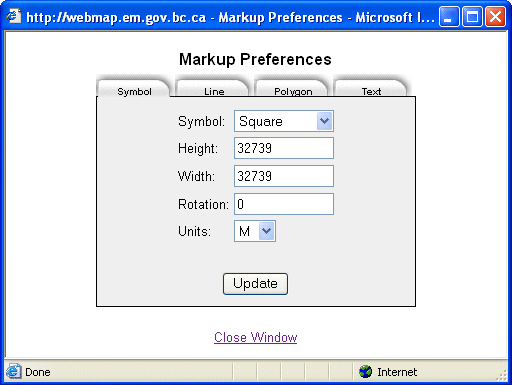
Displays the markup preferences. This will allow you to define the colour, size and style of markup features you add.
Click Preferences to open the Markup Preferences window
Make changes to your markup settings
Click to update your setting
Add your new markup features to your map with the
Symbol,
Polyline,
Polygon and
Text buttons
Layers
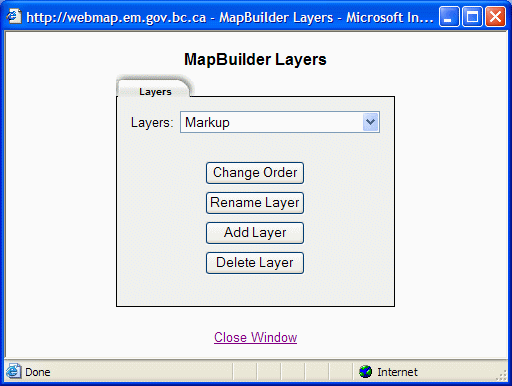
Displays the layer options.
Click Layers to open the Layer Options window
Select a layer to modify
Click to change the drawing order of the selected layer
Click to give the selected layer a new name
Click to add a saved layer from an .mlf file
Click to permanently remove the selected layer from the map
Highlight Tenure
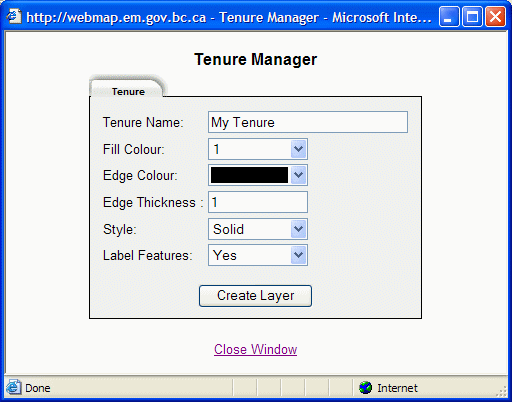
Displays the Tenure options and allows you to build a customized tenure layer.
Select tenures from one of the MTO layers on the map
Click Highlight Tenure to open the Tenure Options window
Enter a name for the tenure selection in the Tenure Name field
 Open
Open
 Save
Save Print
Print Collapse
 Expand
 Edit
Edit Help
Help Symbol
 Polyline
 Polygon
 Text
Text Delete
 Preferences
 Layers
 Highlight Tenure