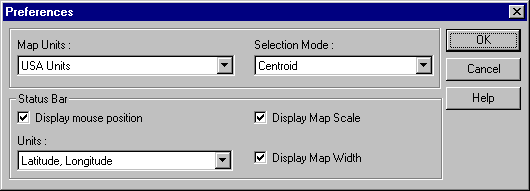
If you choose Centroid (the default), only those features whose centroids are within the selection area will be selected. If you choose Intersection, features that touch, intersect, or are within the selection area will be selected.
When you select features on a map, you can then view a report that provides information about the selected features, or you can adjust the map display to zoom to the selected features. The number and type of selected features are displayed on the status bar at the bottom of the map.
Note When you select a map feature, Autodesk MapGuide selects the feature by its key. Therefore, if you select a map feature that contains multiple points, each of which has the same key, each of those points will be selected. Similarly, if there are multiple features in the map with the same key, selecting one of those features will select all features that share that same key.
You can do any of the following to select features on a map:
Selecting features within other map features
Selecting features within a specified distance from other map features (View Buffers command)
Selecting map features by name
Selecting individual map features
Selecting all map features in a rectangular area
Selecting all map features in a circular area
Selecting all map features in a polygonal area
By default, when selecting features inside a rectangle, circle, polygon, or buffer, Autodesk MapGuide selects only those features whose centroids (center points) are within that selection area. However, you can specify that you also want to select features that intersect the selection area.
If you choose Centroid (the default), only those features whose centroids are within the selection area will be selected. If you choose Intersection, features that touch, intersect, or are within the selection area will be selected.
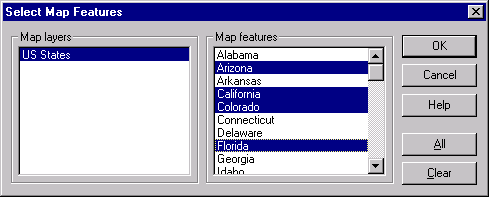
Autodesk MapGuide Viewer can select all map features that are within selected polygon map features. The polygons should be on their own layer in order for this command to work effectively.

For example, if you selected a buffer feature in step 1 that represents a specific distance from a customer's location, and you want to find all Acme Widget resellers within that specified distance from the customer's location, you would select the layer that contains the reseller locations.
All map features from the specified layer that fall within the previously selected polygon(s) are now selected.
By creating a buffer around selected map features, you can view all features that fall within that buffer. This is particularly useful in site selection. For example, you could create a buffer to find all vacant lots within two miles of your stores, or using a report that will calculate area, you could determine the total area within the buffers around your stores.
The View Buffer dialog box appears.
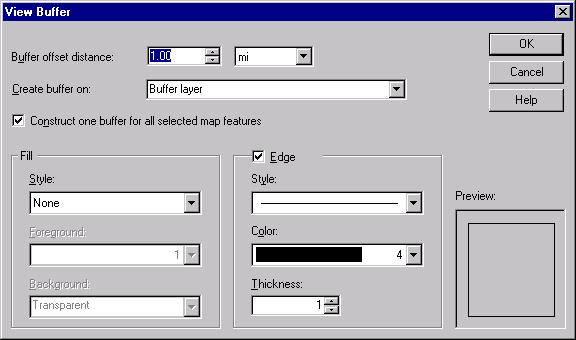
For example, to find all features within two miles of your stores, type 2 in the text box and choose "mi" from the unit list. Note that you can also use the up and down arrows to increase or decrease the distance.
This is particularly useful if any of your buffers overlap and you do not want the overlapping area counted twice. For example, if you want to determine the total area around your stores, and two stores are close enough that their buffers overlap, you would not want to count the overlapping area twice. Overlapping buffers will also appear differently on the screen. For example, if you did not select this check box, overlapping buffers might display like this:

If you did select this check box, however, the same buffers would display like this:

Autodesk MapGuide creates the buffers around the selected features. To select the features within the buffers, you select the buffers, and then use the Select Within command to select map features from other layers that fall within the buffers.
If you receive an error message about low memory while processing the buffers, see Improving Buffer Processing.
If you know the names of the map features you want to select, you can select them from a list.
You can easily select an individual map feature.
Do one of the following:
You can draw a rectangle to select all map features that fall within that rectangular area.
All map features that are within the rectangular area are now selected.
You can draw a circle to select all map features that fall within that circular area.
The radius appears dynamically on the status bar at the bottom of the map as you drag the pointer. When the pointer stops, the radius also appears as a MapTip.
All map features that are within the circular area are now selected.
You can draw a polygon to select all map features that fall within that polygonal area.
All map features that are within the polygonal area are now selected.
You can deselect map features after you have selected them.
Do one of the following: